APT-Cacher NG
Creating a local Cache of Ubuntu, Debian and Linux Mirrors.
APT Cacher NG - About and Overview
Overview of APT-Cacher-NG
APT-Cacher-NG is designed to cache Ubuntu, Debian, and other Linux distributions and packages locally. If you have a homelab, you probably have a lot of VM’s. When one of your machines updates, those updates are stored here. The next machine that is the same or similar can pull from the cache locally instead of going out to the internet again.
My Purpose & Goals
- Quite honestly, my main purpose was because it seemed like fun to do.
- It does speed up package downloads, but my internet is good, that really isn’t a big deal for me.
- We are helping Linux, being a good steward of the internet. If we all do this, that will be less download bandwidth on these distro’s. That will allow them to allocate resources elsewhere than handling all the requests.
Recommendation: Should you do this on your server?
Short answer is YES! (If you already know “you want to do this” and need a guide, skip over the rest of this section and get to the “How To DO IT” area.)
- I will guide you through a “basic” method, this method will have you set up and running in minutes! Roughly only a few copy pasta steps to get APT Cacher NG running! The basic method is so easy, even I can do it. So for the time spent to get anything done is a WIN. Amount Cached / Time Spent = Winner Winner Chicken dinner.
- I will also then advise of the advanced options and “tweaks” if you want to mess with it further. If you want it to be as efficient as possible.
The long answer is maybe…
Phase 1 If you do the short initial version that I will propose, your cache percentages will not be that significant. (My personal data will be far below) i.e. you won’t cache everything. The tradeoff is how EASY this first version is. So, you can set up a LXC that caches using scripts and copy/paste in minutes, and if it caches anything at all… that’s a win.
Phase 2: If you go to the next phase, you can precache a little more, won’t take any more CPU or RAM, but it will take a couple Gig’s of storage. Not that much harder. Once more, pretty easy, copy/paste, and press a GUI button.
- Phase 3: Phase three gets a little tricky. This is where you are “going for it”—trying to cache everything under the sun and satisfy all your obsessive-compulsive desires. I tried this level, got sick of it, and turned it off. This involves updates failing and then diving into the settings to fix them. Quite honestly, I don’t much know what I am doing; perhaps someone with a little knowledge would say “It’s so easy, you don’t know what you are talking about,” and they would be right!
This won’t cache HTTPS; it will only cache HTTP.
HOW TO DO IT
A. I have proxmox. I like Proxmox. I like LXC’s. I like “easy.” Paste this script into your main PVE console.
(There is an apt-get install out there if you want to make an Ubuntu or Debian VM as well.) I will be using the Proxmox LXC because it is lightweight and easy.
B. If you have not heard of Proxmox Helper Scripts, you should look around at them a bit more when you’re done with this!
(A lot of these were created by—and used to be run by tteck, if that rings a bell.)
1
 bash -c "$(wget -qLO - https://github.com/community-scripts/ProxmoxVE/raw/main/ct/apt-cacher-ng.sh)"
Can’t get easier than Copy Pasta, right? Follow the prompts.
When that install finishes, you will get something like this.
🚀 Apt-Cacher-NG setup has been successfully initialized!
💡 Access it using the following URL:
🌐 http://192.168.1.215:3142/acng-report.html
C. Click the link, or type/paste it in a web browser. This is the APT Cache GUI. You won’t have anything there yet—so just save it, bookmark it, or note it for later.
D. Also, make sure you have set up a DHCP reservation or a static IP, so the IP doesn’t change on you.
THE SERVER IS SET!
E. I told you that was easy. The final step of Phase 1 is to update the client. Here is the easy way, and then I’ll explain. This is the command—paste it on the CLIENT (do a VM or another Linux box; LXCs are a tad different). Replace the IP below with your Server IP.
- This command tells the Ubuntu VM instance to look to the Server when it runs an update.
1
echo 'Acquire::http::Proxy "http://192.168.1.215:3142";' | sudo tee /etc/apt/apt.conf.d/02proxy
- Just in case it wasn’t obvious: instead of using the client script above, you can cd into
/etc/apt/apt.conf.dand create or edit02proxy(using nano, vi, etc.). Inside, put:
Acquire::http::Proxy "http://192.168.1.215:3142"
THE CLIENT IS SET
- That’s it. You’re done with Level 1 / Phase 1 – you are caching! Run an update on the newly configured client, then go back to your GUI to see how you did:
http://192.168.1.215:3142/acng-report.html(I’d read the next notes first, but you can!)
F. NOTES on what we did, and more on Phase 1.
Located in
/etc/apt-cacher-ng/acng.conf
The default config in the LXC Server isPassThroughPattern: .*\I had things cache, using this config for days. Supposedly, it lets everything through and might not cache anything, but I did not have that result. It cached things for me. That config allows all HTTPS to pass. (No errors, updates just work. I.e. the update will update without issues. But will not cache everything.)
If you want to bump up the default a bit higher and still stay pretty maintenance free, use this:
PassThroughPattern: ^(.*):443$. This is the config I decided to stick with. More on this later if you choose to continue to Phase 3—or if you want a reminder for when you mess up in Phase 3. I haven’t had issues with this config in the week since I set it up.- LXC’s - LXC Containers are a little different. You can see the similarity, and quite honestly, I am not sure what the extra does, but you can see how similar to VM’s it is. (Replace the IP with your Server IP)
1
2
3
4
5
6
7
8
9
10
echo "Acquire::http::Proxy-Auto-Detect \"/usr/local/bin/apt-proxy-detect.sh\";" >/etc/apt/apt.conf.d/00aptproxy
cat <<EOF >/usr/local/bin/apt-proxy-detect.sh
#!/bin/bash
if nc -w1 -z 192.168.1.215 3142; then
echo -n "http://192.168.1.215:3142"
else
echo -n "DIRECT"
fi
EOF
chmod +x /usr/local/bin/apt-proxy-detect.sh
Got that from here: tteck Github Proxmox discussion
Phase 1: Part #2
- HOST commands – I’m calling this Phase 1 second part because I wanted to show how easy Phase 1 can be (above), and this adds a step. I wasn’t lying, the above works, but I would advise to add this because it’s pretty easy. APT-Cacher-NG doesn’t work on HTTPS. A lot of your repositories are already HTTP, so that is why the above works. But this converts more of them to HTTP. I’m going to list three commands; you’ll see how similar they are. Adapt these commands to any other folders you want to try. Go ahead and cd on down in there and see what’s going on, if you like. I personally have strung these three together with
&&and pasted them as one command. The third command will error if that folder doesn’t exist—no harm though, and if the folder does exist, well, great, it updates it.
1
sudo sed -i 's#https://#http://HTTPS///#g' /etc/apt/sources.list.d/*.list
1
sudo sed -i 's#https://#http://HTTPS///#g' /etc/apt/sources.list
1
sudo sed -i 's#http://HTTPS///#https://#g' /etc/apt/sources.list.d/docker.list
A. This phase takes up a little space—not much, really. We are going to list repositories to cache and then hit the GUI button to cache them. Here are the two things you need (replace your IP’s here):
- GUI:
http://192.168.1.215:3142/acng-report.html - CONFIG on the SERVER:
/etc/apt-cacher-ng/acng.conf First, I would advise pasting any updates you plan to make at the top of the
acng.conffile. (I pasted mine where it was already discussed by default, far down the page, —and yes, I did a LOT of scrolling while messing with it.)- In your
acng.conffile paste any of the below you want to Cache. I utilized ChatGPT to put some of this together, seems legit to me though! Or, if you don’t know either, copy and paste into yours.
1
2
3
4
5
6
7
8
9
10
11
12
13
14
15
16
17
18
19
20
21
22
23
24
25
26
27
28
29
30
31
32
33
34
35
36
37
# Ubuntu Packages
PrecacheFor: debrep/dists/ubuntu/*/binary-amd64/Packages*

# Ubuntu Backports
PrecacheFor: debrep/dists/ubuntu-backports/*/binary-amd64/Packages*

# Debian Packages
PrecacheFor: debrep/dists/debian/*/binary-amd64/Packages*

# Ubuntu Security Updates
PrecacheFor: debrep/dists/ubuntu-security/*/binary-amd64/Packages*

# Debian Security Updates
PrecacheFor: debrep/dists/debian-security/*/binary-amd64/Packages*

# Kernel Updates
PrecacheFor: debrep/pool/main/l/linux-image-*
PrecacheFor: debrep/pool/main/l/linux-headers-*

# Common Packages
PrecacheFor: debrep/pool/main/a/apt
PrecacheFor: debrep/pool/main/s/systemd
PrecacheFor: debrep/pool/main/g/gcc
PrecacheFor: debrep/pool/main/c/curl
PrecacheFor: debrep/pool/main/o/openssl
PrecacheFor: debrep/pool/main/s/ssh

# Additional Common Packages
PrecacheFor: debrep/pool/main/p/python3
PrecacheFor: debrep/pool/main/n/nginx
PrecacheFor: debrep/pool/main/m/mysql-server
PrecacheFor: debrep/pool/main/p/postgresql
PrecacheFor: debrep/pool/main/r/redis

# Proxmox VE Packages
Remap-proxmox: debrep/dists/pve/*/binary-amd64/Packages* ; http://download.proxmox.com/debian/pve
PrecacheFor: debrep/dists/pve/*/binary-amd64/Packages*
B.On the GUI 
- The two boxs that are checked, are checked by default. Click the
Start Mirroringbutton and it will show you what it will cache. (Not actually cache it.) When you are ready, check the
download package filesbox, and then theStart Mirroringand that will actually do it!That wasn’t bad, right? Done with Phase 2
Phase 3
Full disclosure, I quit bothering with this. The trouble of trying to update, and getting an error, and then diving back into
acng.conffile and adding something, then trying an update again, was more of a pain than I wanted to deal with. Perhaps, you have better luck. Ideally, if you resolve every error, by adding to this, then everything will be great. But just as I thought I had it figured out, I got another error, and said “To heck with it.”The default is:
PassThroughPattern: .*and that lets everything through.I suggest
PassThroughPattern: ^(.*):443$since that lets all HTTPS through.If you want to get granular and make sure nothing gets through that shouldn’t, uncomment the above and add something like this:
PassThroughPattern: (packagecloud\.io|packagecloud-repositories\.s3\.dualstack\.us-west-1\.amazonaws\.com|packagecloud-prod\.global\.ssl\.fastly\.net):443$PassThroughPattern: ^(bugs\.debian\.org|changelogs\.ubuntu\.com):443$Adjust as needed.
I got to this point and gave up:
PassThroughPattern: ^(changelogs\.ubuntu\.com|download\.docker\.com|developer\.download\.nvidia\.com|apt\.grafana\.com|repos\.influxdata\.com|ppa\.launchpad\.net|p>\ (maybe I was doing it wrong?)Reverting back to:
PassThroughPattern: ^(.*):443$
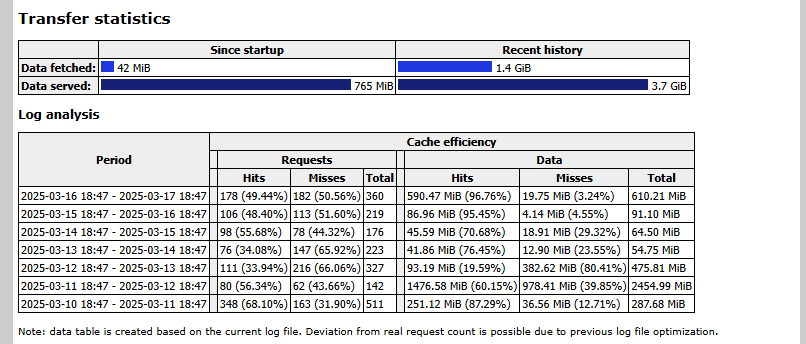
MY DATA
You can see that I am not getting everything, half, but it is getting some and it’s hassle free now that it is set up.
Additional commands
for a “do release upgrade” -
sudo HTTP_PROXY="http://192.168.1.125:3142" do-release-upgradeor bypass the proxy
sudo HTTP_PROXY="" do-release-upgradeFollow the Logs in a LXC -
tail -f /var/log/apt-cacher-ng/apt-cacher.log | pv -q -L 1kRemoves it from an LXC -
rm /etc/apt/apt.conf.d/00aptproxy- in the LXC console.
Sources
- On the GUI
http://192.168.1.215:3142/acng-report.html(replace your IP) under *“Configuration instructions”** there is a “manual” link. I think this is the same - https://www.unix-ag.uni-kl.de/~bloch/acng/html/index.html
- https://wiki.debian.org/AptCacherNg#
On the Proxmox helper script screen - https://www.unix-ag.uni-kl.de/~bloch/acng/
https://qmacro.org/blog/posts/2024/09/03/setting-up-a-cache-server-for-apt-packages/
- HTTP Source file command - https://forum.qubes-os.org/t/trouble-setting-up-apt-cacher-ng/12223